DIY Mantapams or Pooja Mandirs


Years ago we built our own Mantapam [above] after looking at a picture on web. After we did ours, many friends asked me to build one for them or at least provide steps to do it themselves. I figured the second option to be a better one and documented the steps in making one. BUT before we start it would be prudent to remind readers that since I live in the US, naturally, the shops that I go to are either Lowe’s or Home Depot.
So here we go..
List of material you would want to get before you start. In no way shape or form is this exhaustive. But should give you enough to start and make some progress. Do remember that building a Mantapam is minor task compared to making innumerable trips to both Lowe’s and HomeDepot. Also don’t get scared with the list. I am sure I forgot something, so please do not blame me for it.
Things to remember:
1. I am assuming you have at a minimum a Mitre Saw or a Bevel Saw which can cut at 45 degree angle. If you do not, do think of buying one before you start the project.
2. If you do not have a Table Saw and are not inclined to buy one, then please consider getting ready-made drawers.
3. You WILL need a really good power screwdriver and an inexpensive drill. Do not forget goggles, N95 masks and, nice handy gloves.

Figure out the size of Mantapam you want. We did a 4×2 hence got 3 4×2 wood pieces, 0.75 inch thick. As a result the Mantapam will be heavy.

Figure out the height of the mantapam that you want. For a 4×2 size one, it will be good to have at least 20+ inch pillars [inverted table / chair legs]. You can see the chair legs and also the legs for the mantapam itself.

Start with putting the legs to the mantapam. Take one 4×2 wood sheet and drill a pretty decent hole into it. You will need to drill enough for the “Coffee Table Leg” to fit. And screw them from the top.

Then fix all the 4 legs to it. Make sure you are measuring correctly before you drill and fix. End result should look something like this –>

Take one 4×1 board and affix it to the back side using screws. Take another 4×1 board, and cut it into half so that it becomes two 2×1 pieces. Attach them to the either end of the main plank. Should look as shown below..

Once you get to this point, it is now time to attach one more 4×2 plank which will be the base on which Bhagawans will live. Place it, screw it or use wood glue. By then your mantapam should look something like this.

Now time to attach the pillars. Mark 2 inches from the edges on all four sides and then attach the pillars [inverted Legs from the 2nd pic above]. Depending on which one you got, you may have to drill a hole first before you fix them. Make sure the pillars are steady and fixed perfectly [we screwed them so that they won’t move].

Now comes one of THE most important parts of making your mantapam. Placing the last 4×2 board on top of the pillars which make the roof of the mantapam. You have to be really careful to align this plank with the base plank. We have steel scales which we used to align and fix it to the pillars. Also we screwed the roof plank to the pillars to make it a sturdy structure.

Now, for this particular model, instead of covering the entire backside, we decided to instead, cover only half on all the 3 sides. This we accomplished similar to how the base was done i.e. using one 4×1 plank on the back and two 2×1 planks to the side. Then to make it look better we added the “rail moulding”. Use wood glue, your best friend.

Now onto building the Vimaanam for the Mantapam. If this is your first time doing any woodwork and/or using the Bevel or Mitre Saw, then get yourself a good wood moulding for trail-and-error. Set the Bevel to 45 angle and cut the wood. Then take another wood and cut in 45 degree in the opposite direction. Goal is that when you put these two together they should be in L shape at exactly 90. Should fit perfectly, if you have done it good. Depending on how you want your Vimaanam to look, you can go crazy. These are the two different vimaanams we did so far, for your reference.

Again this is one of the toughest parts if you are doing it for the first time. So please take your team to do some trail-and-errors before you go all out.
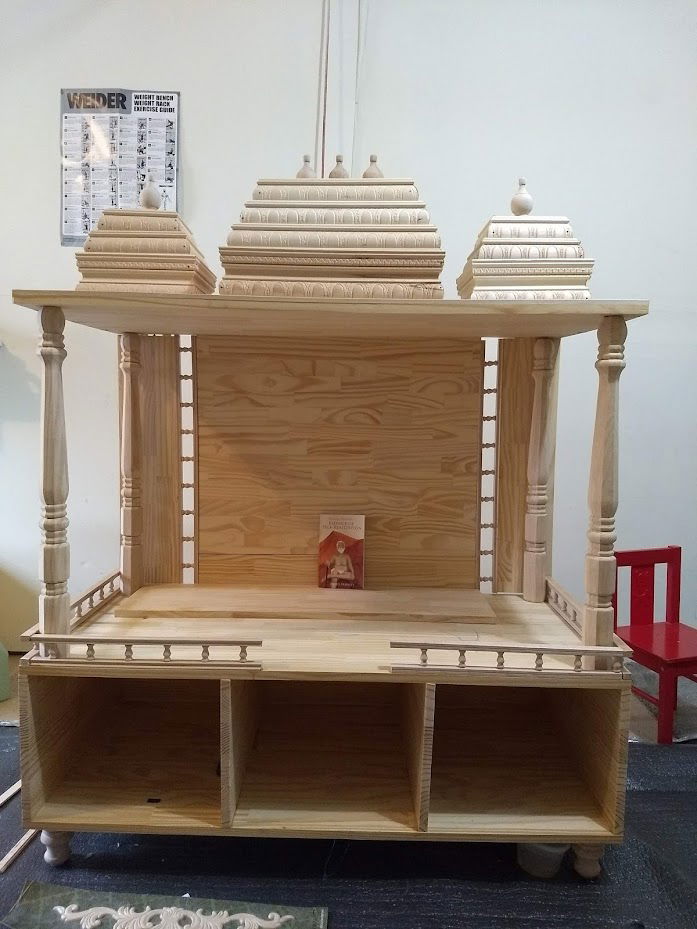
After you build the vimaanam, cover the top with a thin plywood and add the “Large Craft Oak Finials” to it. Drill a hole and then attach it with glue. By now your mantapam should look like this.

The second difficult part is making the drawers. There are two choices you have here.
1. Order them online, from sites such as – https://www.barkerdoor.com/Default.asp [We got drawers from these guys first time around].
2. Build it yourself. We did as per instructions provided here – https://www.youtube.com/watch?v=mhXhezOKnuM
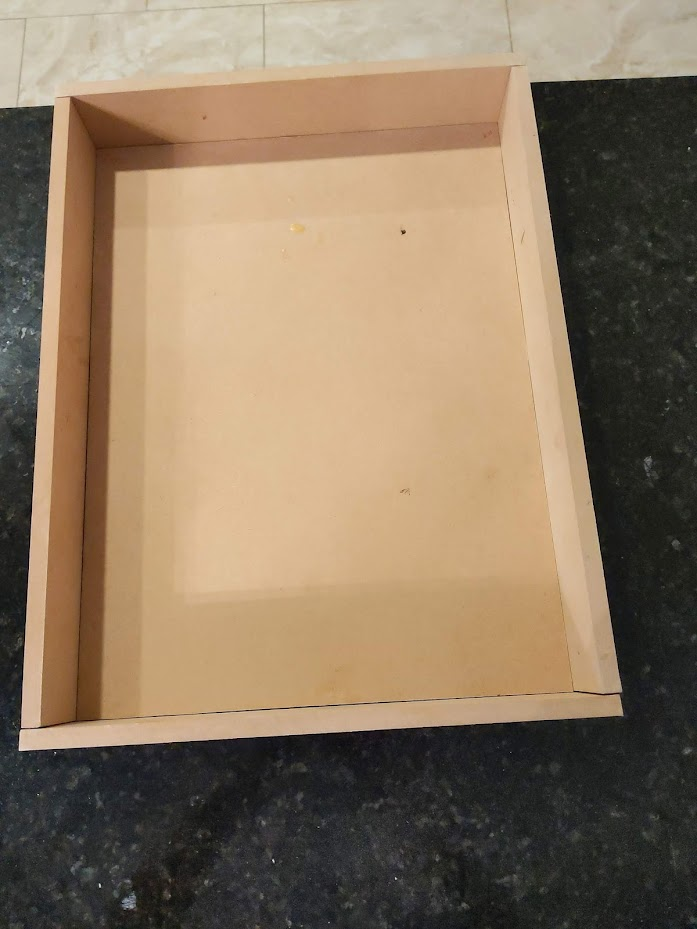
Last step in completing the Mantapam is attaching the drawers to planks based on the size of the drawers you build. Also remember to add two 2×1 planks in the bottom to create space for 3 drawers. Something similar to this

Well once you have the drawers done, attach the Drawer Slides to them as well as these partitions. Please PLEASE follow the instructions that come with the slides since if you don’t, then you will spend a lot of time fixing the drawers.
By this time, your mantapam should be looking finished except for the painting / staining portion. In other words, this is how it will be looking.

Now you have two choices.. either stain the mantapam or spray paint it. Do NOT, I repeat, do NOT put varnish on it since it will not spare the delicate work on the Vimanam or the sides that you may have put.
Either ways make sure you use tonnes of plastic sheets to cover the ground, sides, top, everywhere BEFORE you begin painting or staining. Double mask if needed and if possible.


As you can see we added some more decorations to the sides to make it beautiful. It is entirely your call.. you can go crazy with the different kinds mouldings you get at Home Depot or Lowes or online too.
I hope these instructions were useful to you. If you run into any issues, it is probably because I missed something. So please ping me and I will try to help you.
Hope you have fun making your Mantapam. We definitely did.
Hara Hara Mahadeva!
DISCLAIMER: The author is solely responsible for the views expressed in this article. The author carries the responsibility for citing and/or licensing of images utilized within the text.